News, How-Tos, and Articles by geeks for geeks.

Showing posts with label How-Tos. Show all posts

VLC Player is the most popular (if not one of the most popular) media player in the world. It's interesting to find out that, majority of its users only use it to watch videos and play music but there's much more you can do with it. I take my turn in this article to show you how you can stream (both video and audio) with VLC.

Streaming with VLC comes in two parts: You can either stream to a another location or stream from an existing service. We're going to see how to stream from an existing service notably Youtube.

Streaming With VLC Player

Step 1: Open VLC Player. If you don't have it download it here


Step 2: Select "Open Network Stream" from the "Media" option in the menu bar. You can also use 
the shortcut keys "Ctrl + N".


Step 3: Select the "Network" tab and enter the address to the resource you want to stream. In my situation I will use the link to a Youtube video. Click on Play at the buttom of that Window and wait for it to load. 


Step 4: Profit!!! You have succesfully streamed with VLC :)


I have added a a link to a text file with many streaming services worldwide you can try. Click HERE.


Google has made being unable to connect to the Internet a little less annoying by replacing the error page with an interesting game. If you open latest version of Google Chrome, and can't get online, instead of the usual page telling you you can't connect, you'll see this guy, the Google Chrome dinosaur that always arrives with Internet problems. 
Instead of just having that a static page error page, leaving you with nothing to do, just hit the space bar and the Tyrannosaurus Rex will start an endless runner style video game which I call "Desert Run". T-Rex runs through a desert and you make him jump over the many cacti he encounters. The longer you play, the faster the he runs. You are celebrated for every hundred points you earn and if you lose, just hit the space bar to start again.

To take a look at the game play, you the video below and don't forget to subscribe!

When your PC starts its steady decline into slow speeds, the first thing you’d love to do is head straight fancy new machine. The reality is there are easy changes you can make to speed up your computer. Below are some of the best tips for speeding up your PC.
  1. Turn off Startup Programs

When you install a program in Windows, it may add itself up to the startup register and runs when Windows starts. After installing a lot of software, your boot up process could become considerably slow. If there are programs you don’t use much, they probably don’t need to start every time Windows does. You can disable startup programs manually or use the free tool CCleaner.
MSConfig can be used to configure startup programs and a few other settings. Just follow the steps in this article and you should be fine.

To run MSConfig, open the Start menu and type “msconfig.exe” (without the quotes) in the Search box. As you type, results display. When you see “msconfig.exe,” click on it or press Enter, if it is highlighted.
NOTE: You can open the Run dialog box from the Start menu, type “msconfig.exe” in the Open edit box, and click OK.
01_starting_msconfig


Click the Startup tab on the System Configuration main window. A list of all the startup programs displays with a check box next to each one. To prevent a program from starting up with Windows, select the checkbox next to the desired program so there is NO checkmark in the box. Click OK once you have made your choices.
02_turning_off_startup_programs
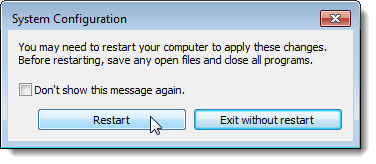
A dialog box displays telling you that you may need to restart your computer for the changes to take affect. Click Restart to restart your computer immediately. If are not ready to restart your computer, click Exit without restart.
03_restart_dialog
Disabling Startup Programs in Windows 8 or 8.1
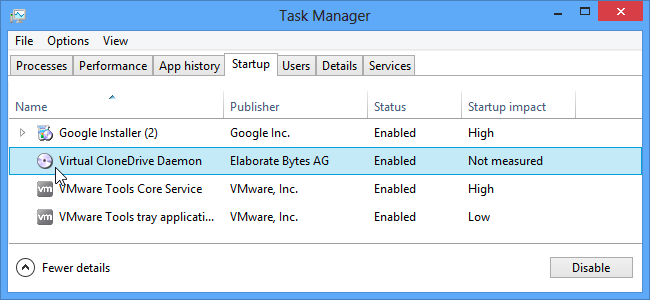
Windows 8 and 8.1 make it really simple to disable startup applications. All you have to do is open up Task Manager by right-clicking on the Taskbar, or using the CTRL + SHIFT + ESC shortcut key, clicking “More Details”, switching to the Startup tab, and then using the Disable button.
It’s really that simple. If you aren’t seeing these options, make sure to click “More Details”, which is in the same place as the “Fewer details” that you see on this screenshot.

Additionally, use the services tab in the msconfig utility to disable the services you don’t you want to execute when the computer starts up. Be careful what you disable since you could prevent critical system programs from starting up. Check the “Hide Microsoft Services” before you disable the services.

  1. Clean Up Unnecessary Files on Your Computer


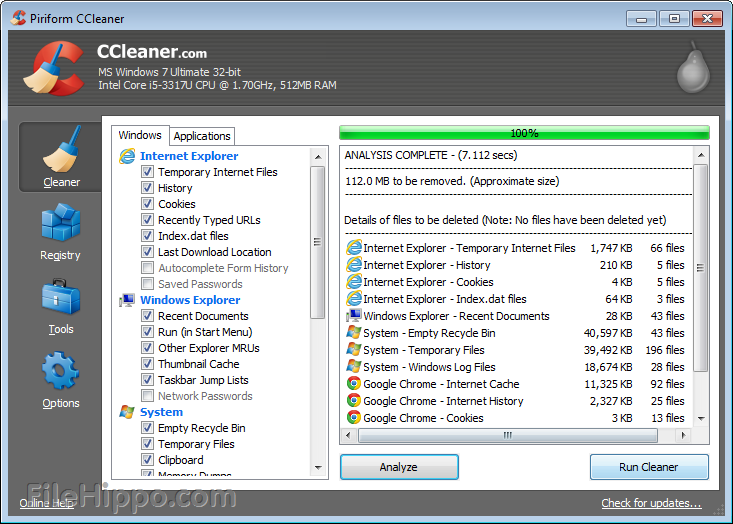
As you use your computer, files collect in all kinds of places. Windows and programs running in Windows create temporary files and log files. Files you have deleted may collect in the Recycle Bin, if you don’t empty it often. When you browse the internet, browsers create temporary files, sites put cookies on your computer, and the download history and form history grows. CCleaner can help you clean up your computer. You can even set up CCleaner to automatically run on a schedule.

To clean your PC:

  1. In CCleaner, click the Cleaner icon at left.
  2. Choose the Windows features you want to clean by selecting their check boxes (you can clean everything under Internet Explorer, for example, by selecting the checkbox next to the heading). When you select or clear certain options, warning text will appear. Read the text and click OK to dismiss the dialog box.Click the Applications tab. The programs listed on this tab will depend on the software you have installed on the system.
  3. Choose the applications or features you want to clean.
  4. Click the Analyze button. CCleaner analyzes the files and Registry keys belonging to the Windows features and applications you have selected. This may take some time.
  5. Once the analysis is complete, you can review which files will be deleted in the text window. To save the list of items to be deleted, right-click in the text window and then click Save to text file... To clean an item right from the analysis list, right-click the item and then click Clean.
  6. Click Run Cleaner. You are warned that CCleaner is about to permanently remove files from the system. Click OK to proceed.
  7. When the cleaning is complete, CCleaner displays a report of deleted files in the text window. To save the list, right-click in the text window and then click Save to text file...
NOTE: Click here to read more on how use CCleaner to clean up the junk in your PC. Stay away from other softwares that claim to boost and speed up your PC (e.g. Registry Cleaner).

  1. Remove Malware, Spyware, and Adware

Malware, spyware, or adware are your computers worst enemy. They significantly affect its performance. Malware such as viruses eat up your RAM, replicate on your hard disk and utilizes a processor. Adwares and spywares make utilize the network resources and makes you internet. There are many utilities such as Malwarebytes, SpyBot AV and adwcleaner. My very favourite is Microsoft’s Free Microsoft Security Essentials which appears in Windows 8.x as Windows Defender.


  1. Uninstall, Uninstall and Uninstall!


A clean machine is a fast machine. That means your best option is to uninstall all the programs you don't use. Delete things like trial software, limited-edition versions, and anything else you're never going to use.
To uninstall software:
  • Click the Start button , and then click Control Panel.
  • Under Programs, click Uninstall a program. (If you don't see this page, change the View by option in the upper-right corner to Category.)

  • Click the program you want to delete, and then click Uninstall.


  1. Use Portable Apps

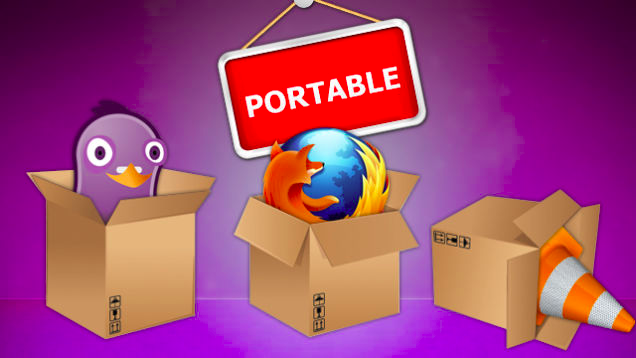
We are used to installing every application we need to use in Windows. Sometimes, these apps clog up the registry and use a lot of disk space and memory. Using Portable Apps, you can install an app once, have all of the necessary files in one place, and even sync the app and its settings across different machines with Dropbox.
The idea is that you can run these portable apps from a flash drive, thus taking your favorite browser or password program with you without having to install it on a computer that isn't yours. This reduces the number of installed applications on your PC and boosts performance. Portable Apps include Firefox, Google Chrome, uTorrent, VLC and VirtualBox. You can grab your copy of portable apps here.
  1. Thoroughly Clean Your Computer

The fan in your computer that draws in air to cool. Dirt clogging up in your system can block clean, cool air from circulating within the computer and this can cause your system to overheat and run sluggishly and maybe even eventually break down. It will be most advisable to take your PC to your nearest Tech Specialist for it to be cleaned up or if you feel you’re tech savvy enough, a few searches on Google will teach you how to do that.


Now, your Windows PC can be faster and more efficient when working or goofing off!
ios-8-third-party-keyboards-announcement-from-wwdc-2014-video
iOS 8 added support for third-party keyboards. Now iPhone and iPad users can finally swap out their keyboards and use some of the same keyboards available on Android devices. Swipe-to-type is now an option for iPhone users, too.
Apple also added a “QuickType” keyboard that offers next-word predictions above the keyboard. In the future, if there’s a cool new keyboard feature — like word predictions or swipe-to-type — you can install a third-party keyboard to get it immediately.

Get Third-Party Keyboards

First, you’ll need to install one or more third-party keyboards on your device. They’re just apps, and are available in the App Store like other apps.
Here are some of the keyboards Apple is featuring in the App Store for the iOS 8 launch:
  • SwiftKey (free): A free keyboard that attempts to provide better predictions. It aims to learn your typing habits by building a profile of the words you use. It can sync this profile across all your devices, but you can disable this feature. SwiftKey also includes swipe-to-type features and is completely free. This is a great keyboard to start out with if you want to play with another keyboard.
  • Swype ($0.99): This is the original keyboard that invented swipe-to-type. It reportedly still has an edge when it comes to swiping.
  • Fleksy ($0.99): Fleksy is a minimal keyboard that relies on swipe gestures and other non-obvious actions to speed up typing. It also has quite a few themes available for it.
  • MyScript Stack (free): Did you ever use a Palm OS device? This keyboard works similarly  — you scribble a character with your finger and the keyboard converts your scribble into a letter.
  • KuaiBoard ($1.99): This keyboard is basically just a clipboard that helps aid repetitive text entry.
These keyboards demonstrate what’s now possible on iOS. There are now even GIF keyboard — like Riffsy – for quickly inserting animated GIFs into other apps.
ios-8-featured-third-party-keyboards

Enable Third-Party Keyboards

To enable a new keyboard after installing it, you’ll need to head into Settings after installing it. Navigate to Settings > General > Keyboards > Keyboards. Tap Add a New Keyboard and select the keyboard you just installed.
You can enable multiple third-party keyboards here so you can easily switch between them later.
add-keyboard-on-ios-8[4]

Give a Keyboard Internet Access

To give a keyboard full Internet access — for example, allowing SwiftKey to synchronize your typing profile across all your devices — tap the name of the keyboard you added on the Keyboards screen and enable “Allow Full Access.”
Apple notes that this could be a security issue, as the keyboard could potentially transmit private data you type — such as your password or credit card information. Keyboards don’t have Internet access by default for this reason, and you don’t have to enable Internet access to use any keyboard. Some keyboard features — like SwiftKey’s syncing — may only be available with Internet access.
give-keyboard-internet-access-on-ios-8

Switch to a Third-Party Keyboard

Once you’ve enabled a keyboard on the Settings screen, it will be available to use. Bring up the keyboard in any app and tap the globe icon in the bottom-left corner of the keyboard to cycle between available keyboards.
You can also long-press the globe icon to see a list of available keyboards — the same list you configured on the Keyboard Settings screen. Tap the name of a keyboard to switch to it.
how-to-switch-between-keyboards-on-ios-8
Use the keyboard normally and, when you want to switch back, tap the globe icon again. Apple requires that all third-party keyboards include a button that switches to the next keyboard, but it will look a bit different on each keyboard.
swiftkey-keyboard-on-ios-8

Configure a Keyboard

Each keyboard will also install its own app icon on your home screen. You can open the app to view settings and configure the keyboard. The apps will often contain information about using the keyboard, too. To uninstall a keyboard, remove the app like you normally would — long-press the app icon on your home screen and tap the X that appears.
configure-swiftkey-keyboard-on-ios-8
That’s basically it — this process will be the same no matter what third-party keyboards you install in the future. The ability to enable multiple third-party keyboards and cycle between them with a single tap is convenient — it allows you to install more specialized keyboards and quickly switch between them without opening any menus.
Thanks to a new native Android tool, you can now easily locate your phone and (in a worst case scenario) perform a remote data wipe. Read on as we show you how to activate the feature on your phone.

What Do I Need?

To follow along with this tutorial you’ll need the following things:
  • 1 Android device running Android OS 2.2+
  • 1 Google account
Note: While Android Device Manager has been available to Google business account users for some time, Google only started rolling it out to consumer/standard accounts in early August, 2013. If Android Device Manager isn’t on your Android phone yet, check back in a few days to see if you’ve received the update.

Turning On Android Device Manager

By default, the new Android Device Manager feature is turned off. In order to enable it, grab your Android phone and navigate to Settings -> Security ->Device Administrators.  This menu will be available to everyone, even if the update hasn’t officially rolled out to their phone. If your phone has received the update, you’ll see the following entry within the Device Administrators menu:
Go ahead and check the checkbox next to Android Device Manager. You’ll be prompted with the following security screen:
Normally those kind of sweeping powers would be a red flag, but in the case of this particular app we’re specifically using it to allow us to remote wipe our phone and change security settings. Go ahead and click the Activate button.
Note: Users on earlier versions of the Android OS may be required to individually check “Remotely locate this device” and “Allow remote factory reset” before accepting the changes.
Once the Android Device Manager has been activated, you can return to the home screen and resume using your phone.

Managing Your Phone via the Device Manager Web Portal

Once you’ve set up the Android Device Manager on your phone, you can begin managing it from the Android Device Manager web portal, available at: https://www.google.com/android/devicemanager. The first time you access the service you’ll need to accept an agreement to allow Android Device Manager to use your location data.After that, you can select your device from the drop-down menu in the corner and perform one of three tasks.
First, using GPS/Wi-Fi location data from the phone, you can locate the phone. This feature is dependent on recent GPS data, and if the GPS/location functionality has been turned off on the phone for a period of time (say, several days), it will simply report that the location is unavailable.
Second, you can ring the device to locate it if it is in earshot. Even if your phone has the ringer turned off or set to vibrate it will switch to the default ringtone at 100% volume. This is the most practical feature of Android Device Manager as not many people routinely deal with device theft, but many of us are guilty of misplacing our devices.
Finally, you can remotely wipe the device. This function initiates a factory wipe on the device. The portion of the warning “We may not be able to wipe the content of the SD card in your device” is a bit ambiguous. Internal storage designated as /sdcard will be wiped. Removable SD cards may be wiped depending on the hardware/OS version. The business version of Android Device Manager has a specific wipe-SD-card functionality, which if not already deployed in the consumer version of Android Device Manager will likely be deployed in the near future.
Have an Android-centric tutorial you’d love to see us tackle? Sound off in the discussion below and we’ll see what we can do.
android-vpn-activated
VPNs on Android have a variety of uses, including downloading apps not available in your country, encrypting your browsing on public Wi-Fi, or just connecting to a company network on the road.

OpenVPN Networks & VPN Apps

Android does not include integrated support for OpenVPN servers. If you use an OpenVPN network, you will need to install a third-party app. OpenVPN Connect, OpenVPN’s official app, works on Android 4.0 and higher and does not require root. To connect to an OpenVPN network on a device running Android 2.3 or older, you will need to root your device.
openvpn-for-android
Depending on the VPN you are using, you may need a dedicated VPN app instead of the VPN support integrated into Android. For example, TunnelBear offers an Android app that handles TunnelBear VPN connections.
tunnelbear-on-android

Integrated VPN Support

Android has integrated support for PPTP and L2TP VPNs. You can connect to these types of VPNs without installing any third-party apps.
To connect to a compatible VPN, open the Settings app and tap More under Wireless & networks. (On Android 2.3, tap Wireless & networks.)
more-wireless-and-networks-settings
Tap the VPN option on the Wireless & networks screen. (On Android 2.3, tap VPN Settings.)
android-vpn-settings
Tap the + button and provide the VPN’s details. Enter a name to help you remember which VPN is which into the Name field, select the type of VPN server you’re connecting to, and enter the VPN server’s address (either an address like vpn.example.com or a numerical IP address).
android-create-vpn-profile
Tap the VPN to connect once you have set it up. You can have multiple VPN servers configured and switch between them from the VPN screen.
You will need the username and password your VPN requires when you connect. However, you can save this account information for next time.
android-vpn-credentials
While connected to a VPN, you will see a persistent “VPN activated” notification in your notifications drawer. To disconnect, tap the notification and tap Disconnect.
android-vpn-activated

Always-On VPN Mode

Android 4.2 includes the option to enable always-on VPN mode. When this option is enabled, Android will never allow data to be sent except over the VPN. This can be useful if you are using public Wi-Fi and want to ensure your VPN is always used.
To enable this option, you must first connect to a VPN and save your account information. You will then find the option under the menu button.
android-always-on-vpn
Again, this feature is only offered in Android 4.2, so you won’t see it if your smartphone or tablet uses an older version of Android.
Mac PC Gaming
Wine serves as a bridge between Windows and Unix based systems. Though there are numerous ways of getting Windows applications to run on a Mac, this is the classic and most convenient route. It creates a wrapper, allowing you to run apps from within. Here is how you can run Windows apps on a Mac using Wine.

What’s a Wrapper?

Basically, a wrapper takes a Windows app and simulates the environment it needs inside a package that the host OS can understand. In some cases a wrapper is so efficient that developers just use it, instead of creating dedicated ports. However, its efficacy is far from 100 percent. That is why Bootcamp is still a popular option.

What’s Wineskin?

Like Unix, Wine is an open-source program, so there are a lot of variants out there, some paid, mostly free, some difficult to sift through, some considerably easy. Wineskin is, in our experience, the most efficient wrapper, created specifically for OS X. Also, it is free to use. We like free things.

How does Wineskin work?

It is a free to use app, very easy to manage. We will be illustrating its use with the free to download game Mari0, by Stabyourself. They have a version native to OS X, but we will be using the Windows’ version just to show you how it’s done.
The first step should be to have the game or app on hand, so we will call that step 0, so step one would be to download and install Wineskin (link at the bottom).
Once installed, start it up. Now, it refuses to let you create content unless you have updated, so, if prompted, update to the latest version. After starting the app, you will notice that there is a “New Engines Available” notification. We need an engine before we get started. Under the “Installed Engines” window, there is a + sign. Click on it and you will be taken to an “Add Engine” window.
Wineskin - NewEngine
From the drop-down list, select the latest version available and click “Download and Install.” This will pop up a new window in case you want to give it a custom name (you don’t have to). Click OK and after a few second/minutes (depending on your connection speed) you will see the newly installed engine in your Wineskin window.
Wineskin - LaunchWindow
Now, it will continue to say “New Engines Available” but that is because it considers any engine you have not installed as “new,” so you needn’t worry about that. Now, on to the meat of things. Click on “Create New Blank Wrapper.” It will launch a window asking you to name it. We will call it Mari0, but its name is not important to the process, you may name it whatever you please.
Wineskin - Name
Press OK. Now, if this is your first time using Wineskin, it will ask you to to install two packages. One is a “Mono” installer, which enables .Net applications (which is basically all of them) and then a “Gecko” installer, which enables HTML based content. They are important, so go ahead and install them both. The download shouldn’t take long and it is a one off, so you won’t have to do it again.
Wineskin - Mono Wineskin - Gecko
Wineskin - Finished
Once the the installers finish downloading, it will create your wrapper. By default, it is stored in Applications > Wineskin > [your wrapper]. Then it will offer to take you to your installed wrapper. Right now, there is nothing in this wrapper. Launching it will do nothing. Now, it gets a little labyrinthian from here, but if you follow our steps, you will see it is actually a walk in the park. Go to your wrapper. Right click and “Show Package Contents.”
Wineskin - Showpackage
Wineskin - LaunchWindow2
Here, you will find the “Wineskin” app right under Contents and a shortcut to Drive_C. Open the wineskin app. It will take you to the launch utility. Now you have two choices, either you are copying an entire folder inside, or you are installing a fresh copy. Let’s go with the installation first. Click on “Install Software.” Now, click on “Choose Setup Executable,” it will launch a finder window, navigate to where your intended game’s setup.exe file is located and select that.
Wineskin - Choose
Now, you will notice that the process is exactly the same as it is on Windows, don’t worry about target directory as it has nothing to do with its location on OS X. Wine only responds to “C:\” anyway. Trivia: it is called C drive, because a long time ago, A:\ and B:\ were dedicated to floppy drives, now the floppy drives are gone, but their letter placement still lives on.
Once installed, it will scan the directory and show you a list of all the executable files, select the one that will launch your game/app and press OK.
Wineskin - Select Exe
Quit the Wineskin window and your wrapper is ready to go. It will show up in your launchpad and will run exactly like any other Mac app.
Alternatively, if you are running a standalone package, one that does not require installation, all you have to do, is launch wineskin through “show package contents” (same as before) and select “Install Software,” only this time, you will select “Copy a Folder Inside.” Through this finder window, find and ‘choose’ your folder.
Wineskin - Advanced
Once you have selected your folder, it will close the Finder and take you back to the wineskin app. Click on Advanced and select “browse” to find your newly copied folder’s exe file. You can take it for a “Test Run” to see if it works.
Wineskin - Mari0

Troubleshooting

Some applications require the presence of specific Direct X packages as well as certain elements of .Net framework that are not part of Wineskin. There is a workaround for that.
1- You can download offline installers for the aforementioned packages and install them the same way you would install a game.
2- There are numerous porting communities out there who have created wrappers for specific games and apps, you can use their wrappers (it is both legal and free) and install your game into those.
3- In case you want to go to the game directory to mod it, open the wrapper’s package and go to “Drive_c”, here you will find the traditional Windows’ file structure and can follow that mod’s instructions.
4- If you need to install more packages, like DLCs or add-ons in the same wrapper, you will follow the exact same procedure, and select the updated exe file.
That ought to do it, give it a whirl, and let us know how it went.

Popular Posts

More

Search This Blog

Most Trending